Wednesday, 26 February 2025

Schedule a power automate cloud flow to run only on 3rd working day of the month

 In Power Automate, scheduling a cloud flow to run on a specific working day of the month (excluding weekends) can be challenging. This article demonstrates how to configure a Power Automate cloud flow that executes only on the 3rd working day of the month using a trigger condition.

Understanding the Requirement

A working day refers to Monday to Friday, excluding weekends (Saturday and Sunday). The 3rd working day of the month can fall on different calendar dates depending on when weekends occur.

For example:

  • If the 1st day of the month is a Monday, then the 3rd working day is Wednesday (3rd).

  • If the 1st day of the month is a Saturday, then the 3rd working day is Wednesday (5th).

  • If the 1st day of the month is a Sunday, then the 3rd working day is Thursday (4th).

Setting Up the Flow

Step 1: Create a Scheduled Cloud Flow

  1. Sign in to Power Automate.

  2. Click on Create and choose Scheduled cloud flow.

  3. Set a recurrence trigger (e.g., daily at 12:00 AM UTC).

Step 2: Apply the Trigger Condition

To ensure the flow runs only on the 3rd working day of the month, use the following trigger condition:

@and(
    or(
        and(
            equals(dayOfMonth(utcNow()),3),
            not(equals(dayOfWeek(utcNow()),0)),
            not(equals(dayOfWeek(addDays(utcNow(),-1)),0)),
            not(equals(dayOfWeek(addDays(utcNow(),-2)),0)),
            not(equals(dayOfWeek(utcNow()),6)),
            not(equals(dayOfWeek(addDays(utcNow(),-1)),6)),
            not(equals(dayOfWeek(addDays(utcNow(),-2)),6))
        ),
        and(
            equals(dayOfMonth(utcNow()),4),
            or(
                equals(dayOfWeek(addDays(utcNow(),-1)),6),
                equals(dayOfWeek(addDays(utcNow(),-2)),6),
                equals(dayOfWeek(addDays(utcNow(),-3)),6)
            ),
            not(equals(dayOfWeek(utcNow()),0)),
            not(equals(dayOfWeek(utcNow()),6)),
            not(equals(dayOfWeek(addDays(utcNow(),-1)),0)),
            not(equals(dayOfWeek(addDays(utcNow(),-2)),0)),
            not(equals(dayOfWeek(addDays(utcNow(),-3)),0))
        ),
        and(
            equals(dayOfMonth(utcNow()),4),
            or(
                equals(dayOfWeek(addDays(utcNow(),-1)),0),
                equals(dayOfWeek(addDays(utcNow(),-2)),0),
                equals(dayOfWeek(addDays(utcNow(),-3)),0)
            ),
            not(equals(dayOfWeek(utcNow()),6)),
            not(equals(dayOfWeek(utcNow()),0)),
            not(equals(dayOfWeek(addDays(utcNow(),-1)),6)),
            not(equals(dayOfWeek(addDays(utcNow(),-2)),6)),
            not(equals(dayOfWeek(addDays(utcNow(),-3)),6))
        ),
        and(
            equals(dayOfMonth(utcNow()),5),
            not(equals(dayOfWeek(utcNow()),0)),
            not(equals(dayOfWeek(utcNow()),6)),
            or(
                equals(dayOfWeek(addDays(utcNow(),-4)),6),
                equals(dayOfWeek(addDays(utcNow(),-3)),6),
                equals(dayOfWeek(addDays(utcNow(),-2)),6),
                equals(dayOfWeek(addDays(utcNow(),-1)),6)
            ),
            or(
                equals(dayOfWeek(addDays(utcNow(),-4)),0),
                equals(dayOfWeek(addDays(utcNow(),-3)),0),
                equals(dayOfWeek(addDays(utcNow(),-2)),0),
                equals(dayOfWeek(addDays(utcNow(),-1)),0)
            )
        )
    )
)

Step 3: Apply the Trigger Condition in Power Automate

  1. Click on the Recurrence trigger.

  2. Expand Settings.

  3. Scroll down to Trigger Conditions and paste the above condition.

  4. Save the flow.

How the Condition Works

  • The expression first checks if the current day is the 3rd calendar day of the month and that it is not a weekend.

  • If the 1st, 2nd, or 3rd day of the month falls on a weekend, the expression shifts the condition to check for the 4th or 5th day.

  • The logic accounts for cases where weekends extend the 3rd working day further into the month.

Trigger a Power Automate Cloud Flow and Power Automate Desktop Flow using VBA in Excel


Trigger a Power Automate Flow Using VBA in Excel

You can trigger a Power Automate Flow from VBA in two ways:

1️⃣ Using an HTTP Request (via Power Automate's HTTP Trigger)
2️⃣ Using Power Automate Desktop (via UI Automation or Command Line Execution)


1. Trigger Power Automate Flow via HTTP Request

Steps to Follow:

  1. Create a Power Automate Flow with an HTTP Trigger

    • Go to Power Automate.
    • Click Create > Automated Cloud Flow.
    • Select "When an HTTP request is received" as the trigger.
    • Click "Save", and Power Automate will generate a POST URL.
  2. Copy the HTTP Request URL

    • This URL is needed in VBA to trigger the flow.
  3. Use VBA to Call the Power Automate Flow

    • Add this VBA code in your Excel file:
vba
Sub TriggerPowerAutomateFlow() Dim http As Object Dim JSONBody As String Dim URL As String ' Set Power Automate Flow URL (Replace with your flow URL) URL = "https://prod-XX.westus.logic.azure.com:443/workflows/XXXXXXXXXXXXXX/triggers/manual/paths/invoke?api-version=2016-10-01&sp=/triggers/manual/run&sv=1.0&sig=YOUR_SECRET_KEY" ' Set JSON payload (optional) JSONBody = "{""message"": ""Triggered from Excel VBA""}" ' Create HTTP Object Set http = CreateObject("MSXML2.XMLHTTP") ' Send HTTP POST Request With http .Open "POST", URL, False .setRequestHeader "Content-Type", "application/json" .send JSONBody End With ' Confirm Flow Triggered If http.Status = 200 Or http.Status = 202 Then MsgBox "Power Automate Flow Triggered Successfully!", vbInformation Else MsgBox "Error: " & http.Status & " - " & http.responseText, vbCritical End If ' Clean up Set http = Nothing End Sub

How It Works:

Triggers the Power Automate flow using an HTTP POST request.
Sends JSON data (optional) to Power Automate.
Checks for success or failure (HTTP status 200 or 202).


2. Trigger Power Automate Desktop (PAD) Flow Using VBA

If you want to trigger a Power Automate Desktop (PAD) flow, you can use a Shell command.

Steps:

  1. Create a PAD Flow

    • Open Power Automate Desktop.
    • Create a new flow.
    • Click "Run URL" and copy the PowerShell command.
    • To get "Run URL" click on insist button and you will find the URL.
  2. Use VBA to Run Power Automate Desktop

vba

Sub RunPADFlowViaPowerShell() Dim shell As Object Set shell = CreateObject("WScript.Shell") ' Run Power Automate Desktop Flow via PowerShell shell.Run "powershell.exe Start-Process 'ms-powerautomate:/console/flow/run?environmentid=Default-0f9f9044-e7d6-4603-b2dc-f0d91fd6ede6&workflowid=77d240b0-00a4-44fe-b948-90b47a51e089&source=Other'", 0, False Set shell = Nothing MsgBox "PAD Flow Triggered!", vbInformation End Sub

Triggers Power Automate Desktop without an HTTP request.
Good for local automation workflows.


Which Method is Best?

MethodUse CaseWorks on Cloud?
HTTP Request (Method 1)Best for triggering cloud-based Power Automate flows from Excel✅ Yes
Power Automate Desktop (Method 2)Best for triggering local automation tasks on your PC❌ No

Automatically Test & Validate Mailbox for new users in dynamics CRM


Schedule a Flow

The flow is scheduled to run automatically once a month.

Initialize Variables

  • Page Number: Starts at 1, to keep track of which page of data is being processed
  • Record Count: Starts at 0, to count the total records processed.

These steps prepare the workflow to handle data processing efficiently, especially when dealing with paginated data or large datasets.

Manage Spreadsheet Data

    Delete Existing Data from the Spreadsheet

    • The flow connects to a spreadsheet stored in One Drive.
    • It runs a specific office script to remove existing data from the file.
Excel Template
function main(workbook: ExcelScript.Workbook) {
    // Access the active worksheet
    const sheet = workbook.getActiveWorksheet();

    // Get the table "Table1"
    const table = sheet.getTable("Table1");
    if (table) {
        // Clear existing table rows (but keep headers)
        const rowCount: number = table.getRowCount();
        if (rowCount > 0) {
            table.getRangeBetweenHeaderAndTotal().clear(ExcelScript.ClearApplyTo.contents);
        }

        // Define the new range for the table
        const newRange = sheet.getRange("A1:J2");

        // Resize the table to the new range
        table.resize(newRange);

        console.log("Data cleared from Table1 and the table resized to A1:J2.");
    } else {
        console.log("Table1 not found.");
    }
}
                                        Office Script


Wait for Spreadsheet Refresh
  • A delay of 30 seconds is added to ensure the spreadsheet has time to refresh and process the changes before any further actions are taken.
   
        This simple process ensures the spreadsheet is cleared and ready for new data input or updates. It’s         an efficient way to maintain clean, updated records in automated workflows

Processing Paginated Data with a Loop

  1. Set Up a "Do Until" Loop
    The loop continues until a condition is met. In this case, the flow keeps running until the Page Number variable equals 0, signaling no more pages to fetch.


  1. Fetch Rows from the "Mailboxes" Table

    • The action retrieves data from the "Mailboxes" entity using an OData FetchXML query.
    • The query includes parameters like page (set to the current Page Number) and filters to specify conditions (e.g., only active records or certain users/groups).
  2. Key Features of the FetchXML Query

    • Retrieves up to 5,000 rows per page.
    • Filters out irrelevant records (e.g., mailbox names with certain patterns or disabled users).
    • Joins with related entities like systemuser and businessunit for more detailed filtering (e.g., users with a specific role or within certain business units).

This workflow is an efficient way to handle large datasets by processing them in chunks and applying custom filtering logic.

Final Steps: Processing and Pagination Logic

  1. Check the Row Count
    After retrieving records, the flow evaluates the number of rows fetched.

    • If the row count is greater than 0, there are more records to process.
    • If not, it indicates the end of the data, and the flow stops.
  2. Increment Variables (When there are more rows):

    • Page Number: Increases by 1 to move to the next page of data.
    • Record Count: Adds the number of rows fetched to track the total records processed.
  3. Print the Data
    The retrieved data is exported to an Excel spreadsheet for further use or reporting.

  4. Stop Pagination (When no rows remain):
    The Page Number is set to 0, signaling the loop to exit.

  5. This ensures all data is processed efficiently, even for large datasets spread across multiple pages, while keeping track of progress throughout the workflow.

Writing and Retrieving Data from an Excel Spreadsheet

  1. Export Data to Excel

    • Data is written to a specified spreadsheet (/33233.xlsx) stored in OneDrive using a custom script.
    • The script processes the data (in JSON format) and inserts it into the spreadsheet.
  2. Wait for Spreadsheet Refresh

    • A 30-second delay is introduced to allow the spreadsheet to refresh and save changes.
    • This ensures the data is fully updated before the next action.
  3. Retrieve Rows from the Table

    • Once the spreadsheet refreshes, the flow retrieves rows from a specific table (Table1) within the file for further processing or analysis.
  4. This ensures smooth handling of data updates and retrieval in automated workflows, maintaining data integrity throughout the process.

Processing Spreadsheet Records with Error Handling

  1. Loop Through Records

    • The flow iterates over each record retrieved from the Excel table in the spreadsheet.
  2. Try Block: Validate and Process Data

    • The Get User Profile (V2) action retrieves user details based on the Email Address field in each record.
    • If the email is valid, this block executes without errors.
  3. Catch Block: Handle Validation Failures

    • If the Try block encounters an error (e.g., invalid email address or user not found), the flow switches to the Catch block.
    • In the Catch block, a row in the spreadsheet (Table1) is updated to reflect the failure (e.g., adding error details).
  4. This design ensures data processing continues even if some records fail validation. It logs errors systematically, maintaining data quality and transparency in the workflow.

This Catch Block section of the flow demonstrates how errors are logged systematically into an Excel spreadsheet when validation fails. Here's a concise explanation for blogging purposes:


Logging Validation Failures in an Excel Spreadsheet

  1. Action: Update a Table

    • The flow updates a specific row in an Excel table (Table1) using the Mailbox ID as the key column to identify the record.
  2. Failure Details

    • Specific fields, such as Validation, are updated to reflect the failure.
    • In this example, the Validation column is set to "Failed," providing clear feedback for error tracking.
  3. Error Transparency

    • By logging validation failures directly in the spreadsheet, it becomes easy for users to review and address issues in the data processing pipeline.

Final Update to the Table Based on Validation Outcome

  1. Condition: Check UPN with Email Address

    • The condition evaluates if the User Principal Name (UPN) is equal to the Email Address in the dataset.
  2. If True (Validation Success)

    • Action: Updates the corresponding row in the Excel table with the success details.
    • Key columns, such as System User ID, Full Name, and others, are populated with valid data.
  3. If False (Validation Fails)

    • Action: Updates the table with failure-specific details.
    • The Validation column explicitly records the failure reason for visibility.

Update a Mailboxes Row

Purpose:

After successfully validating or failing the user details (based on the UPN and email comparison), the flow updates corresponding records in the Mailboxes entity table.

Key Configurations:

  • Table Name: Mailboxes
  • Row ID: Uses the Mailbox ID to identify the specific row for updates.
  • Fields to Update:
    • Email Address O365 Admin Approval Status: Reflects the approval status.
    • Email Address Status: Indicates whether the email is active or pending.
    • Enabled For (Appointments, Contacts, and Email): Specifies if these functionalities are enabled.
    • Postpone Mailbox Processing Until: A timestamp for deferring mailbox processing.
    • Mailbox Name and Status Reason: Updates these fields based on processing logic.


Split Database in MS Access


What is a Split Database in MS Access?

A split database in MS Access is a database architecture where the database is divided into two separate files:

  1. Front-End (FE) Database – Contains forms, reports, queries, macros, and VBA code (UI).
  2. Back-End (BE) Database – Contains tables and data (stored separately).

The Front-End connects to the Back-End using linked tables.


Why Split a Database?

Splitting an Access database provides several benefits:
Improves Performance – Reduces network traffic when multiple users access the database.
Supports Multi-User Access – Many users can work on the database without conflicts.
Enhances Security – The back-end file can be placed on a secure server while users access the front-end.
Simplifies Updates – You can modify the front-end (UI) without affecting the data.
Reduces Corruption Risk – Less risk of database corruption due to file locking conflicts.


How to Split an Access Database?

Step 1: Use the Database Splitter Tool

  1. Open your Access Database (.accdb).
  2. Click on Database Tools > Access Database (Split Database).
  3. Follow the wizard to split the database.
  4. Choose a location to save the Back-End database.
  5. After splitting, Access automatically links the front-end to the back-end.

Step 2: Distribute the Front-End to Users

  • Copy the front-end (.accdb file) to each user's computer.
  • The front-end links to the back-end via linked tables.

How to Link or Relink Tables to the Back-End?

If the back-end file moves, you need to relink tables:

  1. Go to "External Data" > "Linked Table Manager".
  2. Select all linked tables and click "Relink".
  3. Browse to the new back-end location and confirm.

Alternatively, you can use VBA to relink tables dynamically:

vba
Sub RelinkTables() Dim db As DAO.Database Dim tdf As DAO.TableDef Dim strPath As String ' Path to the Back-End database strPath = "C:\Path\To\Backend.accdb" ' Open the Front-End database Set db = CurrentDb ' Loop through linked tables and update path For Each tdf In db.TableDefs If tdf.Connect <> "" Then ' Check if it's a linked table tdf.Connect = ";DATABASE=" & strPath tdf.RefreshLink ' Refresh the table connection End If Next tdf ' Cleanup Set tdf = Nothing Set db = Nothing MsgBox "Tables relinked successfully!", vbInformation End Sub

When Should You Split a Database?

🔹 If multiple users need access.
🔹 If the database grows large (50MB+).
🔹 If you want to protect data integrity.
🔹 If you plan to migrate to SQL Server later.


Alternative: Using SQL Server as a Back-End

Instead of Access for the back-end, you can migrate tables to SQL Server using the SQL Server Migration Assistant (SSMA). This improves scalability and security.

Monday, 24 February 2025

Microsoft Dynamics CRM User License Types and their meaning

User License Types
User License Type License Type Meaning
1ProfessionalFull access user with comprehensive capabilities.
2AdministrativeUser with administrative privileges for system management.
4BasicUser with limited access, suitable for basic functionality needs.
5EssentialUser with minimal access, typically for lightweight tasks.
6DeviceLicense assigned per device, allowing multiple users to share the same device.
7External ConnectorAllows external users to access the system without individual licenses.
8LimitedUser with restricted access, confined to specific modules or features.
9Read-OnlyUser permitted only to view data without making any modifications.
10Team MemberUser with access to collaborative features and basic functionalities.
11StudentLicense tailored for educational purposes, providing necessary tools for students.
12FacultyLicense designed for educational staff, offering tools required for teaching.
13GuestTemporary access for external users, often with limited permissions.
14PartnerAccess provided to business partners, enabling collaboration and specific functionalities.
15DeveloperUser with access to development tools and environments for creating and testing applications.
16TesterUser designated for testing purposes, with access to testing tools and environments.
18EnterpriseComprehensive access for users within an enterprise, covering all standard features.
21BusinessLicense suitable for business users, providing essential tools for business operations.
22Non-ProfitLicense offered to non-profit organizations, often at a discounted rate.
23GovernmentLicense tailored for governmental agencies, adhering to specific regulatory requirements.
24AcademicGeneral license for educational institutions, covering both students and faculty.
25TrialTemporary license allowing users to evaluate the system before committing to a purchase.
26SubscriptionLicense based on a recurring payment model, providing access as long as the subscription is active.
27PerpetualOne-time purchase license granting permanent access to the software.
28ConcurrentLicense model allowing a set number of users to access the system simultaneously.
29FloatingLicenses that are not assigned to specific users but can be used by any user within a group, up to a limit.
30Node-LockedLicense tied to a specific device or node, restricting usage to that particular hardware.
32SiteLicense permitting unlimited use within a particular location or site.
33GlobalLicense allowing usage across multiple locations worldwide.
34OEMOriginal Equipment Manufacturer license, typically bundled with hardware.
35VolumeLicense purchased in bulk, often at a discounted rate, for large organizations.
42Cloud Solution ProviderLicense provided through a cloud solution partner, offering cloud-based services and support.
43Service Provider License AgreementLicensing program for service providers, enabling them to offer software services to end customers.
44Academic VolumeVolume licensing program specifically for educational institutions, facilitating large-scale deployments.
66ClassroomLicense tailored for classroom settings, providing tools necessary for teaching and learning.
68Developer NetworkSubscription-based license providing developers with access to a wide range of Microsoft software for development and testing.
70CompetencyLicense granted to partners who have demonstrated expertise in specific areas, providing additional benefits and support.
72ResellerLicense for organizations authorized to sell software products to end customers.
73DistributorLicense for entities responsible for distributing software products to resellers.

Monday, 26 June 2023

Power Automate - How to split a string and loop through the splitted string in Power Automate


    1. Click on New flow and Create an Instant Cloud Flow.

        2. Enter the Flow Name, select Manually Trigger a Flow, Click on Create.


        3. Click on New Step.

    
        4. Type Compose in search box and click Compose action from Data Operation under All tab.


        5. Input some countires and seperate it with ";".


         6. Click on New Step, type initialize variable in search box and click Initialize Variable from Actions Tab.
    

        7. Select variable type as Array, Give a name to Array Variable "Split Array".
            Write an expression to split a string from compose output.
            For that, click on Add dynamic content -> Expression
            Under Expression input box, write a function Split(outputs('Compose'),';')
            Click Ok.


        8. Click on New Step, type Apply to each in search box and click Apply to each control from Actions Tab.


        9. In Apply to each action, insert Split Array from dynamic content.


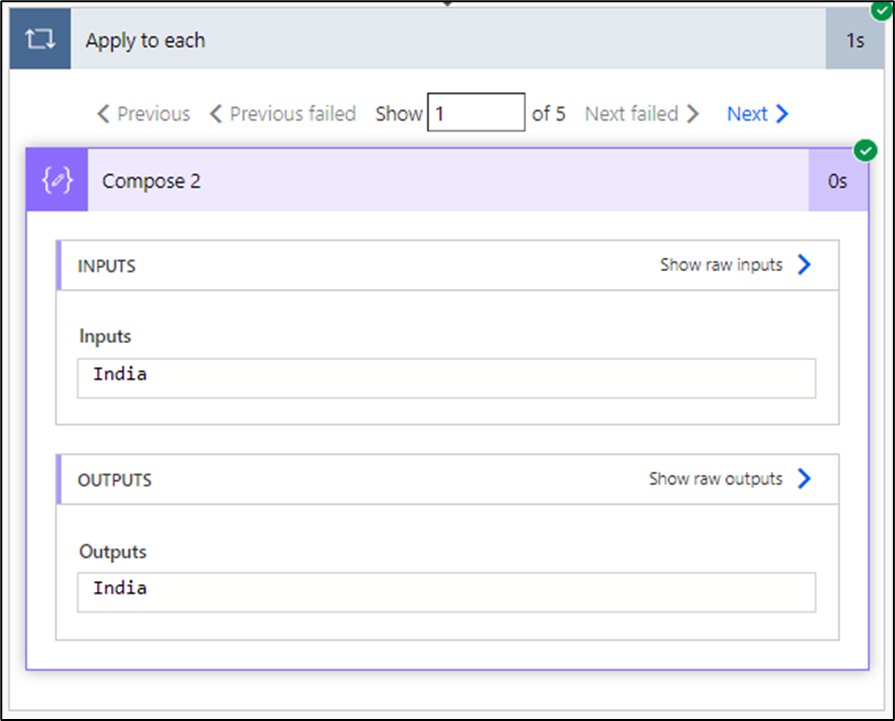
        10. Under Apply to each action create a Compose action and manually input "@item()" to get splitted values.


        11. To see output, Save and Test flow and Run flow manually.

    
        12. To see iterated values, click on Next.


Tuesday, 29 November 2022

VBA Advanced Topics

Class Modules

VSTO Add-Ins

Creating Add-Ins using Custom UI Editor

Microsoft Edge and Google Chrome automation using Selenium IDE

Adobe Acrobat Pro Automation

Invoke a SOAP Web Service

Update Share point list from Excel and extract data from share point to excel

SQL Connection

Pivot Table

Multiple dependent hierarchy with Index and Match

Mail Merging

Office Add-Ins

Error Handling Techniques

Dictionary and Collection

Arrays

Ubound and Lbound

API Functions

Shell Scripting(WScript)